

Brisket can be intimidating, given the size and time required. But it can be quite simple and effortless as well. When you taste the crispy bark combined with the juicy meat, you’ll know the effort was worth it!
As you all know, my approach to everything is the MIME Method – Maximum Impact, Minimum Effort. Below are my thoughts and tips for the simplest brisket possible on the Big Green Egg or a similar kamado grill. This isn’t a definitive technique for brisket. There are a variety of techniques and tips that work, but I like to keep it MIME.
The actual steps are quite straightforward: Prep, spice, smoke, and slice. Instead of a typical recipe format, let’s discuss the key components.
Anatomy
A whole brisket, known as the packer brisket, is composed of two overlapping pectoralis muscles. Packers can range from 10-16 pounds. The side fully covered with fat is known as the fat cap. The other side is exposed meat, and this is where the bark will form. The leaner end of the packer is called the flat (#1 on image below) while the fattier end is called the point (#2). The pectoralis muscles run in perpendicular directions. Before you start, examine the meat side and note the directions of the muscle fibers on the flat end and which corner the fibers run towards (#3). Also try to identify where the point transitions to the flat across the packer. Understanding the anatomy of your packer is a key step to proper slicing.

The Fat Cap
There are always debates about the fat cap. General recommendations for trimming are to leave 1/4-1/2” of fat. On the meat side, between the two muscles, you will find a harder piece of fat. I will take the effort and time to trim most of that out as it doesn’t render well.
The bigger debate is whether to smoke with the fat cap turned up or down. I’ve tried both, and the meat turns out the same. A popular theory states that turning the fat cap up allows the fat to render into the meat. But, due to the density of the fibers, the melted fat just drips around the sides of the packer. I do prefer the taste and texture of the fat when the cap is turned up; it crisps up almost like a bark. However, I feel the smoke ring on the meat comes out better with the fat cap down, which is how we kept it for the competition. If doing two packers side by side, or if the packer is so large it extends beyond the plate setter in the Egg, then fat down will better protect the meat from overheating.
The Rub
Dry brine only the meat side, if you have time (see here). I don’t see any benefit of brining the fat cap. The idea is to let the salt dissolve and spread into the meat and it can’t do that through the fat.
The classic Texas brisket is a simple salt and pepper mix. Use a large grain salt like kosher or pink salt, and a coarse pepper. Additions like onion powder, garlic powder, or paprika are not uncommon as well.

To add some flavor and complexity, use a pre-made rub in addition to the salt/pepper base. I go moderately heavy with the base. Then I cover it completely with the rub, leaving no meat or fat showing. As the bark forms, the flavor of the spices will tone down and soften. In order to appreciate all the flavors, go heavy here.
For the competition, we used Spiceology’s Honey Habanero rub for two briskets and KQ2 Charcoal Beef Rub for the other two, including the judge’s selection. The Honey Habanero rub is balanced well between sweet and spicy that blend into a complex kick during a long cook. This is one of my go-to rubs and goes great on pretty much everything from poultry to veggies. The KQ2 produces a dark crisp bark with spices that augment the natural flavors of the meat.
Placement
Position the plate setter so one of the legs is at the back of the Egg, near the hinge side. That is where you will also place the point end of your packer. Because the heat is stronger in the back of any kamado, the thicker point is better suited in that orientation. The flat will then sit near the handle side.

Cooking Temperature
Brisket takes time. You just cannot rush it. There are various recommended temperature ranges, I keep it around 225 or 245 degrees. At 225, I anticipate and schedule for 1 hour 15 minutes per pound. At 245, I plan for 1 hour per pound. Because the cook is so long, I generally don’t fret over fluctuations in temperature once the meat is placed; it handles temperature swings quite well.
The Cook
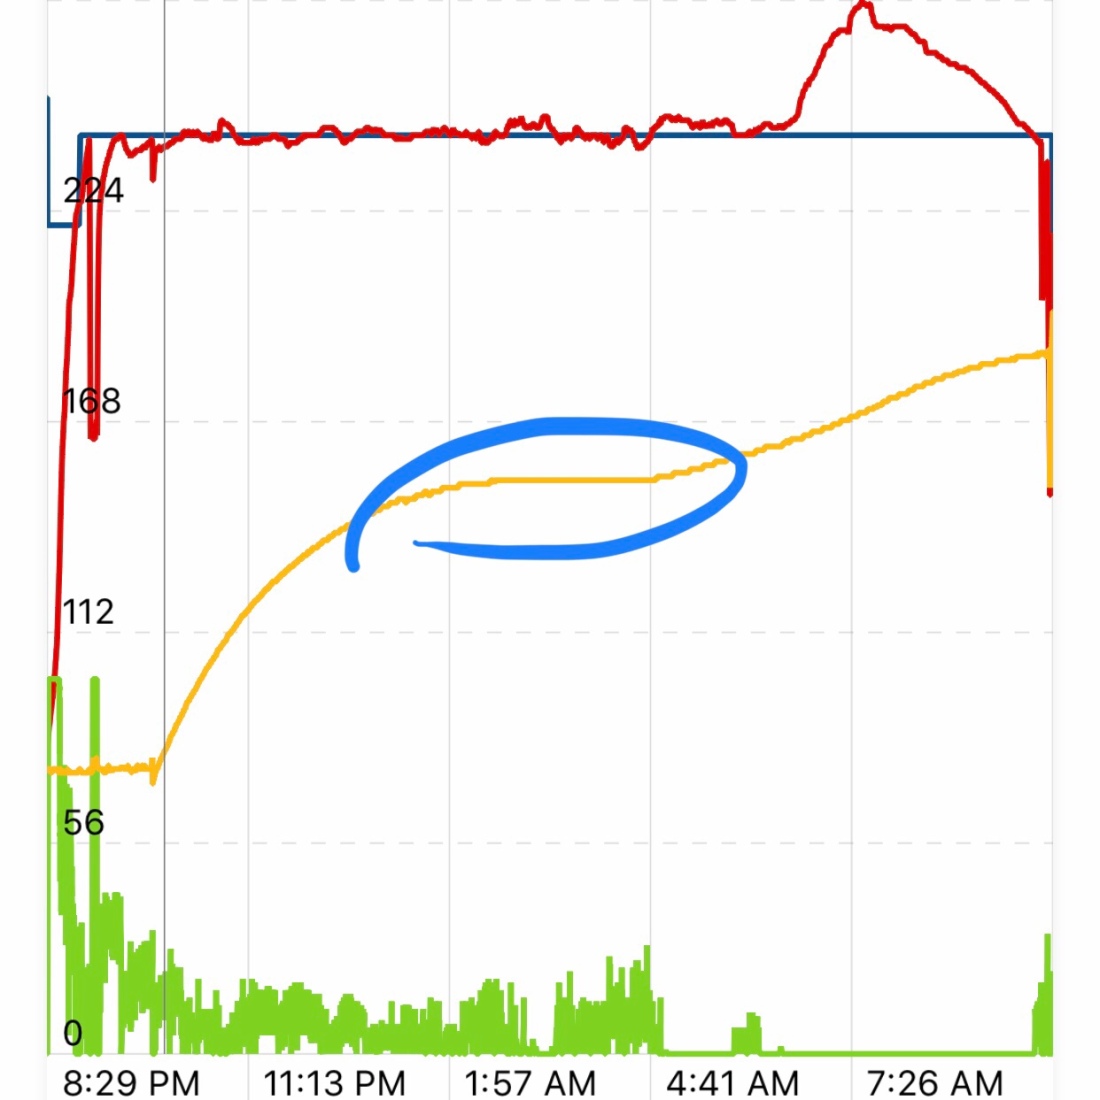
The biggest area of discussion here is how to handle the stall that will occur 3-5 hours into the cook. During this time, the surface moisture of the meat evaporates and cools it. The temperature of the meat will not change, so it can hold between 150-170 degrees for hours (blue circle). The options are to wait it out or to wrap it in foil or butcher paper, a method known as the Texas Crutch. A crutch will reduce the stall and the brisket will cook faster, but the steam inside the wrap tends to soften up the bark, affecting the final texture. For a crisper bark, be patient and wait it out. The brisket will eventually pass through the stall.
I used a Flame Boss temperature controller to monitor my meat and pit temperatures. It also maintains and stabilizes the pit temperature. This is not required but very convenient. I have done plenty of briskets in the Big Green Egg without it and they have been just as effortless.
Here is when the MIME Method deviates from the techniques of other pitmasters. There is nothing to do during the cook. No wrapping. No spritzing. No mopping. No injecting. Just wait.
Go to sleep (really).
I will not open the kamado once the meat has been placed unless there is a problem with my pit temperature.
Once complete, double wrap it with butcher paper and hold it in an oven at 150 degrees or a room temperature cooler. The meat needs time to cool before slicing.
Internal Temperature
Because the pectoralis muscles are always in use, the fibers are high in connective tissue, making for tougher cuts. Fat renders around 130-140 degrees, but collagen and connective tissue liquefies around 160-180 degrees. The internal temperature targets need to be maintained well above that for an extended duration to really denature the collagen into the gelatinous liquid we love in our briskets.
Depending on your source, most internal temperature target recommendations are 197 degrees or higher. Some say the magic number is 203 degrees. Brisket is one of the rare occasions where I will go by feel over temperature. Once my meat probe hits 197, I will start probing my meat with the instant thermometer to get an overall feel of the meat. I will then probe every 15-20 minutes. When most areas probe in and out easily, like a toothpick in a cake, I’ll call the cook complete. I’ve seen this happen anywhere from 197-205 degrees. Because of the differing thickness of each packer, there will be variations in temperature; this is why I rely more on feel than temperature from one specific area.
Slicing
This is an area that is often neglected but can make all the difference in how your brisket tastes. Slicing any cut of meat in the wrong direction can change the bite from tender to chewy. The slice should be perpendicular to the fibers (think against the grain). This ensures that each bite contains smaller cross sections of fibers that separate easily. A slice with the fibers means longer, longitudinal fibers in each bite that don’t separate as well. This alone can change the texture of the bite. After all the time already spent on the brisket, take the time to slice it right.
Because the two pectoralis muscles are perpendicular, the direction of the slice needs to be changed between the flat and the point. First, find that corner of the flat the fibers ran into, identified at the beginning of the cook. Sometimes, you can still see the direction of the fibers where the bark cracks on the meat side (the red arrow below).

Make the first slice (line #1) perpendicular to these fibers to separate the flat from the point. Note how this is at an angle to how the meat appears to sit. Then make slices of the flat from the inside to the edge, parallel to line #1. Going inside out helps me keep the cut consistent against the fibers.
The second major slice (line #2) is to divide the point in half. This is at a 90 degree angle from the first slice. Again, slice from the inside out to the edge. As you approach the ends of the point, slice them into cubes for burnt ends. Because the flat also runs under the point, you will see the opposing directions of the muscle fibers from this section’s slices.

Avoid the temptation to make parallel slices from one end of the packer to the other. Slices should be 1/4” or a pencil’s thickness on the flat and just a tad thicker on the point. I find it easier to slice fat side up, irrespective of how it was cooked.
After hours of cooking, now it’s time to enjoy your brisket slices. Let it rest on one finger and see the brisket bend. Inspect the dark crunchy bark. Admire the smoke ring. See how easily the fibers of the meat pull apart. Taste the flavors and moisture. And lastly, recognize that much of the work was just understanding the process and waiting. That is Maximum Impact, Minimum Effort.

Share your own tips and techniques below…
Great post! We will be linking to this particularly great content
on ourr website. Keep upp thee good writing. http://boyarka-inform.com/
Leave a comment